2022년 8월 5일 금요일

[패스트캠퍼스] react 강의 학습일지 - 8주차, React


React&Redux로 시작하는 웹프로그래밍_8주차


css in js의 문제점: https://speakerdeck.com/vjeux/react-css-in-js


React라이브러리: styled-components


스타일링 라이브러리 (스타일 관련 컴포넌트)

https://styled-components.com/


*프로젝트 설정하기*

1. 프로젝트 만들기

2. 리액트 설치

# with npm
npx create-react-app my-app

3. 스타일드 컴포넌트 설치 (my-app안에 설치하기)

# with npm
npm install --save styled-components

*참고: 프로젝트 컴파일 전에 설치하기

* package.json에서 설치 확인하기


4. 폴더설정과 파일만들기

   4-1. components 폴더 안에 .jsx파일 만들기


   4-2. .jsx파일에 rfc 이후 스타일드 컴포넌트 파일 (getting start 부분 복붙)

import React from 'react'
import styled from 'styled-components'; // styled 연결해주기

export default function StyledComponentExample() {


      // Create a Title component that'll render an <h1> tag with some styles
      const Title = styled.h1`
        font-size: 1.5em;
        text-align: center;
        color: palevioletred;
      `;

      // Create a Wrapper component that'll render a <section> tag with some styles
      const Wrapper = styled.section`
        padding: 4em;
        background: papayawhip;
      `;

      // Use Title and Wrapper like any other React component – except they're styled!
      return(
        <Wrapper>
          <Title>
            Hello World!
          </Title>
        </Wrapper>
      );

}


   4-2. App.js에 .jsx파일 연결하기


5. 랜더링하기

cd my-app
npm start


6. 브라우저에서 정상작동하는지 확인하기


* button 예제


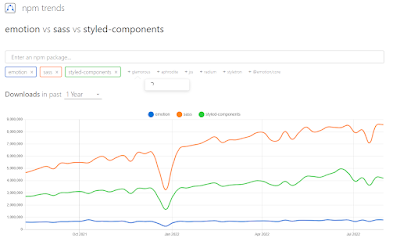
* 라이브러리 트랜드 확인하기

검색: npm trend

주소: https://npmtrends.com/

원하는 라이브러리를 선택해 비교도 가능함


React 라이브러리: Redux


주소: https://redux.js.org/

Redux가 하는 일: 스토어를 통해 컴포넌트들이 상태를 업데이트 한다. 상태가 변경되면 자동 랜더링이 된다.

스타일링 라이브러리 (스타일 관련 컴포넌트)

https://styled-components.com/


*프로젝트 설정하기*

1. 프로젝트 만들기 (폴더명 예: redux-start)

2. 리액트 설치

# with npm
npx create-react-app my-app

3. Redux 라이브러리 설치 (my-app 안에 설치하기)

cd redux-start //폴더로 이동 후 설치
npm i redux

4. 개발 서버 열기

cd my-app
npm start


5. 액션 만들기


6. 리듀서

리덕스의 리듀서란,

Pure Function (항상 같은 인풋을 받아 항상 같은 리턴을 함) 시간에 따른 변화는 없어야함

리듀서를 통해서 상태가 바뀌었는지 확인한다.

function 리듀서 (previousState, action {

  return newState;

}

이뮤터블해야함, 즉 오리지날 스테이트와 새로만들어진 스테이트는 별도에 객체로 만들어져, 두개가 비교되어 상태가달라졌음을 리덕스가 인지함


#패스트캠퍼스 #내일배움카드 #국비지원 #K디지털기초역량훈련 #바이트디그리 #react강의


2022년 7월 31일 일요일

[패스트캠퍼스] react 강의 학습일지 - 7주차, React

React&Redux로 시작하는 웹프로그래밍_7주차


React 환경설정하는 방법


- Visual Studio Code (Javascript로 만들어진 IDE) 사용

* 추천 Extensions *
1) ES7+React snippets (React 약어들의 모음)

사용방법::
.jsx 파일에서
rfc 치면, function형 컴포넌트를 바로 생성
rcc, react 클래스 컴포넌트를 바로 생성


2) ESLint
3) Indent-rainbow
4) Prettier
5) rainbowbracket


React App (Web app)만들어보기
공식 문서 주소: https://ko.reactjs.org/docs/create-a-new-react-app.html


1. 문서를 참고하여, Node 버전을 확인 후 설치하기

* vscode 터미널에서 node 버전 확인 : node -v
* node 버전 변경하기 (vscode에서 작동하지 않음, 원인: 관리자권한)
powershell을 관리자권한으로 실행후 : nvm use 버전

? node를 설치하는 이유: 로컬에서 리액트 앱이 돌아갈 수 있도록 해주는 환경
npm (node package manager)도 자동 설치되고
npm이 설치되면 npx (node package runner)도 자동 설치된다.


2. vscode 터미널에서 명령어 실행하기
명령어: npx create-react-app my-app
명령어를 실행하면 진행할지에 대하여 물어보면 y누르고 설치하기

3. 설치된 파일 확인하기


4. vscode에서 App 실행하기 - 브라우저에서 열림
   명령어: 
    App 실행하기: cd my-app 후 npm start
    App 종료하기 : Ctrl+C
    * App.js 안의 function App()안에 작성하면 바로 반영된다.


JSX


공식 문서 주소: https://ko.reactjs.org/docs/introducing-jsx.html

JSX란? JavaScript를 확장한 문법
React.createElement의 간편한 표현식


Props


공식 문서 주소: https://ko.reactjs.org/docs/components-and-props.html

Props란? JSX로 전달하는 값
순수한 함수로 사용해야한다.


컴포넌트


공식 문서 주소: https://ko.reactjs.org/docs/components-and-props.html

컴포넌트 합성: 여러 컴포넌트를 모아서 하나의 컴포넌트를 만듦
컴포넌트 추출: 여러 곳에서 사용되거나/복잡한경우 끄집어 내서 사용


State / lifecycle


공식 문서 주소: https://ko.reactjs.org/docs/state-and-lifecycle.html

컴포넌트 내의 상태: 자신의 출력값을 변경
Class component 는 state LifeCycle 로 관리
Functional component는 훅으로 관리
lifecycle: 생성되고 사라지는 순서 (마운트 -> 업데이트 -> 마운트 해제)
주의: state에 props를 복사하지 말것


이벤트 / 합성이벤트

공식 문서 주소: https://ko.reactjs.org/docs/events.html
이벤트 핸들러는 모든 브라우저에서 이벤트를 동일하게 처리하기 위해 합성이벤트 객체를 받는다.


LIST와 Key

공식 문서 주소: https://ko.reactjs.org/docs/lists-and-keys.html
Key: 고유해야함

FORM

공식 문서 주소: https://ko.reactjs.org/docs/forms.html
제어 컴포넌트 / 비제어 컴포넌트


Hooks

공식 문서 주소: https://ko.reactjs.org/docs/hooks-intro.html
*16.8부터 React 요소로 새로 추가되었으므로 옛 프로젝트에는 없을수 있음
재 사용성에 대한 장점
컴포넌트 사이에서 상태 로직을 재사용하기 어려움


Composition

공식 문서 주소: https://ko.reactjs.org/docs/composition-vs-inheritance.html
컴포넌트 안에서 컴포넌트를 모아서 출력
HOC

공식 문서 주소: https://ko.reactjs.org/docs/higher-order-components.html

고차 컴포넌트는 기존 컴포넌트를 가져와서 새 컴포넌트를 리턴한다.
즉, 인자로 컴포넌트 받고 새로운 컴포넌트로 리턴한다.

Memoization

메모이제이션은 컴퓨터 프로그램이 동일한 계산을 반복해야할때,
이전 계산한 값을 메모리에 저장함으로써 동일한 계산의 반복 수행을 제거하여
프로그램 실행 속도를 빠르게 하는 기술이다.


#패스트캠퍼스 #내일배움카드 #국비지원 #K디지털기초역량훈련 #바이트디그리 #react강의


2022년 7월 21일 목요일

[패스트캠퍼스] react 강의 학습일지 - 6주차, React

React&Redux로 시작하는 웹프로그래밍_6주차


* 참고 웹사이트 *


React 연습할때 유용한 사이트

codesandbox 

주소: https://codesandbox.io/
사용법: create sandbox: official static에서 static 선택하기

w3schools.com : 바닐라js 연습

React 정보를 찾을때 유용한 사이트
MDN
(공식문서) 웹표준 문서

React의 CDN (Content Delivery Network)
(공식문서) 웹에서 사용되는 다양한 컨텐츠/리소스를 저장하여 제공하는 시스템
검색: react document cdn


DOM / Element

element는 사용자 눈에 보여지는 것, DOM은 컴퓨터/브라우저가 이해하는 element의 원형


바닐라js vs. react 비교

순수 자바스크립트 = 바닐라 라고함. 

바닐라를 사용한 코드
<!DOCTYPE html>
<html lang="en">
<body>
<script src="https://unpkg.com/react@18/umd/react.development.js"></script>
  <script src="https://unpkg.com/react-dom@18/umd/react-dom.development.js"></script>/script>
  <div id="root"></div>
  <script>
    const rootElement = document.getElementById("root");
    const elementV = document.createElement("h1");
    elementV.textContent = "Hello, World!";
    rootElement.appendChild(elementV);
  </script>  
</body>
</html>

리액트를 사용한 코드
*render 방식이 바뀜
https://ko.reactjs.org/blog/2022/03/08/react-18-upgrade-guide.html
<!DOCTYPE html>
<html lang="en">
<body>
  <script crossorigin src="https://unpkg.com/react@18/umd/react.production.min.js"></script>
  <script crossorigin src="https://unpkg.com/react-dom@18/umd/react-dom.production.min.js"></script>
  <div id="root"></div>
  <script>
    const rootElement = document.getElementById("root");
    const root = ReactDOM.createRoot(rootElement);
    //const elementV = document.createElement("h1");
    //elementV.textContent = "Hello, World!";
    const element = React.createElement("h1", { children: "Hello, World!"});
    //rootElement.appendChild(elementV);
    root.render(element);
  </script>  
</body>
</html>

차이
    //chrome 개발자 도구에서 console을 열면, 구조가 다른것을 확인할 수 있다
    console.log(elementV);
    console.log(element); //리액트가 객체를 생성함


JSX문법 & Babel

JSX: 문자도 HTML도 아닌 JavaScript의 확장 문법
Babel (바벨): 자바스크립트 컴파일러 (https://babeljs.io/)
(컴파일러: 언어해석기, 특정 언어를 다른 프로그래밍 언어로 옮기는 프로그램)

즉, Javascript가 JSX를 이해할 수 있도록 바벨을 사용함.

Unpkg을 이용해 Babel 연결하는 방법: 주소 찾아서 연결하기
검색방법: babel unpkg cdn link 구글링


  <!-- Load Babel -->
  <script src="https://unpkg.com/@babel/standalone/babel.min.js"></script>
 
  <div id="root"></div>

  <!-- Your custom script here -->
  <script type="text/babel">
    //변수를 직접 html에 넣는다. 모든것을 함수/변수화할수 있는것이 JSX의 장점
    const rootElement = document.getElementbyId("root");

    const text = "hello World!";
    const titleClassName = "title12";
    const customH1 = <h1 className={titleClassName}>[text]</h1>;
    const customH2 = <h1 className={titleClassName} children={text}></h1>;
    const customH2 = <h1 className={titleClassName} children={text} />;

    //spread 연산자
    const props = { className: titleClassName, children: text };
    const customH3 = <h1 {...props} />; //아래와 동일
    const customeH3 = {
      <h1 className={props.className} children={props.children} />
    };
    const element = customH1;

    ReactDOM.render(element, rootElement);

  </script>


  <div id="root">
    <h1>HELLO</h1>
    <h3>World!</h3>
    <h5>BYE BYE</h5>
  </div>

  <script>

    //멀티 elements 생성 , 재 사용 가능
    const rootElement = document.getElementbyId("root");

    const element = (
      <React.Fragment
        className="box"
        children={[
          React.createElement{"h1", null, "Hi"},
          React.createElement{"h3", null, "bye"},
          React.createElement{"h5", null, "World"},
        ]}
      />
      );

    const element1 = (
      <React.Fragment
        className="box"
        children={[<h1>hi</h1>, <h3>bye</h3>, <h5>world</h5>]}

        // children={[
        //   <h1>hi</h1>,
        //   <h3>bye</h3>,
        //   <h5>world</h5>
        //]}
      />
    );

   
    const element2 = (
      <React.Fragment>  
        <h1>hi</h1>
        <h3>bye</h3>
        <h5>world</h5>
      </React.Fragment>
    );

    //<React.Fragment> 생략가능
    const element2 = (
      <>
        <h1>hi</h1>
        <h3>bye</h3>
        <h5>world</h5>
      </>
    );

    ReactDOM.render(element, rootElement);
    ReactDOM.render(element1, rootElement);
    ReactDOM.render(element2, rootElement);

  </script>  


<!-- Custome Element -->
<div id="root"></div>

<script>

  //찍어내기
  const rootElement = document.getElementbyId("root");
  const paint = (title, description) => {
    <>
      <h1>{title}</h1>
      <h5>{descriptiton}</h5>
    </>
  };

  const element = {
    <>
      {paint("title1","normal")}
      {paint("title2","hard")}
      {paint("title3","extream")}
    </>
  };

  ReactDOM.render(paint(), rootElemnet);

</script>  


<script>

  //위와 같은 코드, children 추가 (갯수 무제한)
  const rootElement = document.getElementbyId("root");
  const Paint = (title, description, children) => {
    <>
      <h1>{title}</h1>
      <h5>{descriptiton}</h5>
      {children}
    </>
  };

  const element = {
    <>
      <Paint title="title1" description="normal">
        <h1>Children is here</h1>
      </Paint>
      <Paint title="title2" description="hard" />
      <Paint title="title3" description="extream" />
    </>
  };

  ReactDOM.render(paint(), rootElemnet);

</script>  


리액트의 리랜더링

바닐라 JS 는 변경으로 인해 Element를 다시 그리고, React는 변경된 부분만 다시그린다.

//바닐라 JS는 버튼 자체를 새로 만들지만, React는 숫자만 변경하고 버튼은 그대로 놔둔다.

  <!-- // 바닐라 JS -->
  <script>

    const rootElement = document.getElementbyId("root");

    function random() {
      const number = Math.floor(Math.random() * (10-1)+1 );
      const element = `
      <button>${number}</button>
      `;
      rootElemnt.innerHTML = element;
    }

    setInterval(random, 1000); //1초마다 random 함수를 계속 불러와라

  </script>

    <!-- //Babel -->
    <script type="text/babel">
      const rootElement = document.getElementbyId("root");

      function random() {
        const number = Math.floor(Math.random() * (10-1)+1 );
        const element = <button>${number}</button>;
        ReactDOM.render(element, rootElement);
      }

      setInterval(random, 1000); //1초마다 random 함수를 계속 불러와라

  </script>


이벤트 핸들러 써보기

React: on{Event} (카멜 케이스로 프롭스 전달하기)


컴포넌트 상태 / 사이드이펙트

컴포넌트: 앨리먼트의 집합
상태: useState 상태값을 관리해주는 hook
사이드이펙트: 부수적인 효과를 낼때 사용

Hook
커스텀 훅
반복: 함수로 작성
hook들이 반복은 custom Hook으로 이용해서 상태관리하기
이름정할때, use+카멜케이스 이름

Hook Flow
훅들의 호출 타이밍

Form
* 예제 참고 하기


Error
* 예제 참고하기


#패스트캠퍼스 #내일배움카드 #국비지원 #K디지털기초역량훈련 #바이트디그리 #react강의

2022년 7월 13일 수요일

[패스트캠퍼스] react 강의 학습일지 - 5주차, JS

React&Redux로 시작하는 웹프로그래밍_5주차

JavaScript Essentials_JS


개요(ECMAScript) 및 프로젝트 초기화

ECMA 스크립트 / ES6 / 에크마 / js / 자바스크립트

프로젝트 초기화
1. 폴더 생성
2. 터미널: npm init -y
3. npm i parcel-bundler -D
4. package.json 파일에 scripts부분에 dev, build 명시
 "scripts": {
    "dev": "parcel index.html",
    "build": "parcel build index.html"
  },
5. index.html 만들기 > main.js 연결하기
<script src="./main.js"></script>
6. main.js 만들기
7. 터미널 npm run dev 브라우저에서 열기


데이터 타입 확인

console.log(typeof 'Hello World');
console.log(typeof 123);
console.log(typeof true);
console.log(typeof undefined);
console.log(typeof null);
console.log(typeof {});
console.log(typeof []);

function getType(data) {
  return Object.prototype.toString.call(data).slice(8, -1);
}
console.log(getType(123));
console.log(getType(false));
console.log(getType(null));
console.log(getType({}));
console.log(getType([]));

OR

//getType.js
export default function getType(data) {
  return Object.prototype.toString.call(data).slice(8, -1);
}

//main.js
import getType from './getType.js';
console.log(getType(123));
console.log(getType(false));
console.log(getType(null));
console.log(getType({}));
console.log(getType([]));


산술, 할당 연산자

//산술 연산자 (arithmetic operator)
console.log(1 + 2);
console.log(5 - 7);
console.log(3 * 4);
console.log(10 / 2);
console.log(7 % 5);

//할당 연산자 (assignment operator)
let a = 2;
// a = a + 1;
a += 1;
a -= 1;
a *= 1;
a /= 1;
a %= 1;
console.log(a);


비교, 논리 연산자

//비교 연산자 (comparison operator)
const a = 1;
const b = 3;

console.log(a === b); //일치연산자, a와 b를 비교해서 일치하는지 비교함

function isEqual(x, y) {
  return x === y;
}

console.log(isEqual(1, 1));
console.log(isEqual(2, '2'));

console.log(a !== b); //불일치 연산자, 서로가 다른지 확인해주는 연산자

console.log(a < b);
console.log(a > b);
console.log(a <= b); //비교연산자, 작거나 같다
console.log(a >= b); //비교연산자, 크거나 같다


//논리 연산자 (logical operator)
const a = 1 === 1;
const b = 'AB' === 'AB';
const c = true;

console.log(a);
console.log(b);
console.log(c);

console.log('&&: ', a && b && c); //&&(And연산자) false가 하나 이상이면 false가 리턴되고 전부 true일때 true가 리턴됨
console.log('||: ', a || b || c); //||(OR연산자)  true가 하나 이상이면 모두 true가 리턴되고 전부 false일때 false가 리턴됨
console.log('!: ', !a); //!(NOT 부정연산자) 반대되는 값이 리턴됨


삼항 연산자

//삼항 연산자 (ternary operator)
const a = 1 < 2;

if (a) {
  console.log('참');
} else {
  console.log('거짓');
};

console.log(a ? '참' : '거짓');
//a가 true면 첫번째 '참'을 리턴해라, false면 두번째 '거짓'을 리턴해라


조건문 If Else

getRandom.js
export default function random() {
  return Math.floor(Math.random() * 10);
}

main.js
//조건문 (if statement)
import random from './getRandom.js'

//console.log(random());

const a = random();

if (a === 0) {
  console.log('a is 0');
} else if (a === 2) { //if 조건이 true이면 실행 아니면 다음 행
  console.log('a is 2');
} else {
  console.log('rest...');
}


조건문 Switch

//조건문 (switch statement)
//어떠한 변수가 특정한 값으로 딱 떨어지면 if보단 switch가 직관적일 수 있음

import random from './getRandom.js'

const a = random();

switch (a) {
  case 0:
    console.log('a is 0');
    break; //하나의 케이스를 마무리함
  case 2:
    console.log('a is 2');
    break;
  case 4:
    console.log('a is 4');
    break;
  default: //위 값이 없을때 마지막에 실행
    console.log('rest...');
}


반복문 For

//반복문 (For statement)
//구조: for (시작조건; 종료조건; 변화조건) {}
for (let i = 0; i < 3; i += 1) {
  console.log(i);
}

//반복문으로 HTML 제어하기
1. index.html에 <ul></ul> 추가
2. 연결된 .js에 아래 코드 입력

const ulEl = document.querySelector('ul');

//console.log(ulEl);

for (let i = 0; i < 10; i += 1) {
  const li = document.createElement('li');
  //메모리 상에 li테그를 만들어서 li변수에 넣음, 출력은 안됨
  li.textContent = `list-${i + 1}`;
  if ((i + 1) % 2 === 0) { //짝수찾기
    li.addEventListener('click', function() {
      console.log(li.textContent);
    });
  }
  ulEl.appendChild(li);
}


변수 유효범위

// 변수가 동작할 수 있는 유효범위 (Variable Scope)
// var, let, const (var은 권장하지 않음)

//let, const 블록 범위의 유효 범위를 갖는다.
function Scope() {
  //console.log(a); //a는 undefined 로 뜸 값이 지정되지 않았다.
  if(true) {
    //console.log(a); //a는 undefined 로 뜸 값이 지정되지 않았다.
    const a = 123;
    console.log(a); //블록 레벨에서 유요한 값을 갖는다.
  }
  //console.log(a); //유효범위를 넘음
};
Scope();


// var: 함수 범위의 유효 범위를 갖는다. 메모리 누수로 발전할 수 있어 권장하지 않음.
function Scope() {
 
  if(true) {
    var a = 123;
  }
  console.log(a);
};
Scope();


형 변환

//형 변환 (Type conversion)

const a = 1;
const b = '1';

console.log(a == b); //동등연산자: 형변환 후 데이터 타입을 비교해 준다.
서로 다른 값이 같다고 나올 수 있기때문에 자바스크립트에서는 잘 사용하지 않는다.


//truthy (참 같은 값)
// true, {}, [], 1, 2, 'false', -12, '3.14' ...

//Falsy (거짓 같은 값) - 기억하기**
// false, '', null, undefined, 0, -0, NaN (Not a number)

if (true) {
  console.log(123);
}//실행됨


if (false) {
  console.log(123);
}//실행되지 않음

if ('false') { //truthy값으로 문자데이터는 true와 같은 값으로 아래 코드가 실행됨
  console.log(123);
}

* NaN = 1 + undefined(숫자로 판단할 없는 )
숫자 데이터긴 한데 숫자가 아닐때, NaN으로 표기


함수

// 함수
1
function 함수명(매개변수,매개변수) {
}

2
function (매개변수,매개변수) {} 함수명이 없는 익명함수

호출방법
함수명(인수, 인수);

3
function 함수명() { //매개변수가 없는 함수
  console.log(arguments) //함수 안에서 arguments값을 사용가능
  return argumnets[0] + arguments[1]
}
호출방법
console.log(함수명(인수,인수))


function sum(x, y) {
  console.log(x+y);
};

sum(1,3);


function sum2(x, y) {
  return x+y;
};

const a =sum2(1,3); //함수의 결과가 반복적으로 사용될때는 변수에 넣어쓰기
console.log(a);

console.log(sum2(1,2)); // 함수의 결과가 한번만 필요할때 바로 쓰기


화살표 함수

//화살표 함수 - 함수의 축약형

//일반함수
const couble = function (x) {
  return x * 2;
};

//화살표 함수 사용법
const doubleArrow = x => x * 2;

//화살표 함수의 정의
const doubleArrow = (x) => {
  return x * 2;
};

- 문자, 숫자, 불린, null, undefined, [배열], ({객체데이터}) 출력가능


IIFE (즉시 실행 함수)

// 즉시실행함수 (IIFE, Immediately-Invoked Function Expression)
// 함수를 만들어 바로 실행시킬때 사용

// 포멧: (함수)();
(function () {
  console.log(a * 2);
})();

// 포멧 (함수()); *권장
(function () {
  console.log(a * 2);
}());


호이스팅
// 호이스팅
// 함수 선언부가 유효범위 최상단으로 끌어올려지는 현상

const a = 7;

double();

//함수 선언을 하단에서 해도 위의 double();이 실행되는 현상
//복잡한 로직에서 많이 사용되고, 함수명을 보고 유추할수 있음
function double() {
  console.log(a * 2);
};

//double 함수가 하단부에서 만들어졌기때문에 위의 double();이 실행되지 않음
const double = function() {
  console.log(a * 2);
};

타이머 함수
//타이머 함수
//setTimeout(함수, 시간): 일정 시간 후 함수 실행
//setInterval(함수, 시간): 시간 간격마다 함수 실행
//clearTimeout(): 설정된 Timeout 함수를 종료
//clearInterval(): 설정된 Interval 함수를 종료


setTimeout(function () {
  console.log('3초후 실행');
}, 3000); //3000ms = 3초

//IIFE 로 작성
setTimeout(() => {
  console.log('3초후 실행');
}, 3000);


//set으로 시작, clear로 종료
const timer = setInterval(() => {
  console.log('3초마다 실행!');
});

const h1El = doucument.querySelector('h1'); //h1누르면 타이머해제
h1El.addEventListener('click', () => {
  clearInterval(timer);
});


콜백

//콜백
//함수의 인수로 사용되는 함수

//setTimeout(함수, 시간);
function timeout() {
  setTimeout(() => {
    console.log('3초후 실행');
  }, 3000);
};
timeout();
console.log('끝');

//위 코드의 문제점: 끝이 먼저 출력되고 3초후 실행이 실행됨.
//이때 콜백함수로 만들어주면 3초후 실행 -> 끝으로 나옴

function timeout(cb) { //cb는 callback의 약어
  setTimeout(() => {
    console.log('3초후 실행');
    cb(); //실행위치를 보장함
  }, 3000);
};
timeout(() => {
  console.log('끝');
});


JS 클래스

메모리의 효율성을 위해 클래스를 사용함

생성자 함수(prototype) == 클래스

//생성자 함수(prototype)
- 함수명은 '파스칼 케이스' 만들기. (e.g. User)
- 키워드: new
- prototype을 사용하면, 메모리에 한번만 생성되기때문에 메모리 효율성이 좋다.prototype을


*리터럴 방식

특정 문자를 이용해 데이터로 만들어 내는것을 리터럴 방식을 통해 손쉽게 해당하는 데이터를 생성한다.


this

// //this ***중요***
// //알반(Normal)함수는 '호출 위치'에 따라 this 정의
// //화살표(Arrow)함수는 자신이 선언된 함수 범위에서 this 정의!

const jen = {  
  name: 'Jen',
  normal: function () {
    console.log(this.name)
  },
  arrow: () => {
    console.log(this.name)
  }
}

jen.normal() // Jen이 출력, 호출위치가 testname
jen.arrow() // undefined 출력, 호출위치는 아무 상관없고 선언된 함수 범위가 없어서 undefined가 나옴


const bob = {
  name: 'Bob',
  normal: jen.normal, //호출하고 있지 않고, bob의 normal에 할당만함
  arrow: jen.arrow
}

bob.normal() //bob이 출력됨
bob.arrow() //undefined가 출력됨


//파스칼형식 - 생성자 함수 포멧

function User(name) {
  this.name = name
}
User.prototype.normal = function() {
  console.log(this.name)
}
User.prototype.arrow = () => {
  console.log(this.name)  
}

const jen = new User('Jen')
new라는 키워드를 통해 User라는 생성자 함수를 Jen이라는 인수와 함께
실행해서 jen이라는 인스턴스(=변수) 만들어줌
생성자 함수를 실행면 객체데이터가 만들어지고 호출이 가능한 상태가

jen.normal() //jen출력
jen.arrow()  //undefined 출력


const timer = {
  name: 'Jen',
  timeout: function() {
    setTimeout (function () {
      console.log(this.name)
    }, 2000)
  }
}
timer.timeout() //여기서 일반함수는 undefined를 출력한다. 실행하는 위치
Jen을 출력하려면, 여기서는 화살표 함수를 써야한다.


const timer = {
  name: 'Jen',
  timeout: function() {
    setTimeout (() => { //화살표함수가 만들어진 범위
      console.log(this.name) //여기서 this = timer임.
    }, 2000)
  }
}


ES6 Classes

// - 키워드: class
// class 키워드를 사용해 새로운 생성자(prototype)을 만든다.

function User(first, last){
  this.firstName = first
  this.lastName = last
}
User.prototype.getFullName = function () {
  return `${this.firstName} ${this.lastName}`
}

--> 코드를 직관적이고 유연한 문법으로 정리하는 방법
   class 사용, constructor 내부함수 사용해야함
class User {
  constructor(first, last) {
    this.firsName = first
    this.lastName = last
  }
  getFullName() { // prototype을 사용하는것과 같은 의미
    return `${this.firstName} ${this.lastName}`
  }
}

const jen = new User('Jen', 'Lee')
const bob = new User('Bob', 'Park')
const leo = new User('Leo', 'Smith')

console.log(jen)
console.log(bob.getFullName())
console.log(leo.getFullName())


상속(확장)

// //상속(확장)
// - 키워드: extend
// - 키워드: super

class Vehicle  {
  constructor(name, wheel) {
    this.name = name
    this.wheel = wheel
  }
}
const myVehicle = new Vehicle('운송수단', 2)
console.log(myVehicle)

//확장 혹은 상속: 미리 만들어져있는 기능에 추가하는 기능

class Bicycle extends Vehicle {
  constructor(name, wheel) {
    super(name, wheel)  //여기서 vehicle이 실행됨
  }
}
const myBicyle = new Bicycle('삼천리, 2')
const sonsBycycle= = ('세발, 3')
console.log(myBicylce)
console.log(consBicylce)


class Car extends Vehicle {
  constructor(name, wheel, license) {
    super(name, wheel)
    this.license = license
  }
}
const myCar = new Car('벤츠', 4, true)
const sosCar = new Car('현대',4, false)

console.log(myCar)
console.log(sonsCar)

JS 데이터

// 문자
// String: "", '', ``
// 구글검색: string mdn

//indexOf()

// Number

// Boolean: true, false

// undefined

// null

// Array: []

// Object: {}


// 숫자와 수학

// 배열


JS 데이터 실습


구글검색: localstorage mdn 
링크: https://developer.mozilla.org/en-US/docs/Web/API/Window/localStorage
storage - google 개발자 도구 화면


#패스트캠퍼스 #내일배움카드 #국비지원 #K디지털기초역량훈련 #바이트디그리 #react강의